Chocolate Banana Waffles

The best thing about waffles in my humble opinion is that you can have them for breakfast, as a snack or even as pudding. Basically they’re a 24/7 food that quite frankly is underrated.

Now this recipe is for chocolate and banana, but you can mix it up and try other fruits and combos too. Strawberries and maple syrup, yogurt and blueberries. The world is your oyster, or rather the waffles are.

Now I know bananas aren’t the lowest of low Fodmaps but eaten in moderation they shouldn’t cause you too much of an issue! If they do, as previously mentioned swap the fruit. Dark chocolate goes very well with raspberries and you can pretty much eat a whole punnet of them on the low Fodmap diet.

I’m lucky enough to have a waffle iron. It’s nothing fancy and cost me about £10 on amazon which is very worth it if you make waffles on the regular. If it’s a one off, you can use a griddle pan or frying pan! If you do this, remember to use a little oil and you’ll need to flip the waffle half way through cooking!

As always I use doves farm flour. I find it’s one of the better brand and it does make super soft waffles. However feel free to experiment and try rice or oat flours too for a bit of difference!

Here’s to happy waffle making! The recipe card is below! Get your waffle on people!

@myibsandme

Lemon and Raspberry Drizzle Cake

One of the firm family favourites in my household is the lemon drizzle cake. My siblings constantly pester me to make one, and so a few years into the Low Fodmap diet I’ve decided to stop making one I can’t eat, and join in on the fun with a low Fodmap version.

I use the same recipe for all my gluten free cakes, 280g or 10oz of all the dry ingredients and 5eggs. I don’t use zantham gum, I find using a good quality self raising flour such as doves farm works just as well as adding the gum, plus it saves you fiddling about with half teaspoon measures. The only difference between this cake mix and a normal GF sponge is the fact I add the juice of three lemons, and the zest too. Plus the raspberries that get layered in.

So, if any of you reading this are regular bakers, or even watch the GBBO you’ll be familiar with a few different cake making techniques. For this recipe, I’ve used the all in one method. It’s no-nonsense, virtually fool proof and is the quickest method of them all. You basically bung all of your butter, sugar, eggs, flour, lemon zest and juice into a bowl before whizzing it together with an electric whisk. Alternatively you can use the creaming method, which is particularly good if you’ve got young bakers who want to stir and mix by hand.

The creaming method

Once the batter is ready, it’s all in the layering of the raspberries. Now don’t get sucked into adding the raspberries to early. If you add them to the mix after the flour or even with the egg you’ll end up with mushy pips all through the cake. Instead I place half of the batter on the base of my tin before adding around 50g raspberries, delicately placed one by one before being covered in the other half of the batter. This time when you add the raspberries press them into the batter a little more so they’re easily covered by your cake mix. If not, when they cook you’ll end up with a raspberry sized whole and gooey cake batter. Gross. The other benefit of putting the fruit in by hand is that you avoid one of Mary Berries bug bears – all your fruit falling to the bottom of the cake in a gooey mess. By placing it in you’ll not only avoid the fruit sinking but can also ensure everyone gets a piece of raspberry goodness! Yippie!

The perfect raspberry distribution.

Now, you have to be patient when you bake this. It’s a lot of mix, and a lot of wet ingredients plus the added raspberries. In my oven it takes 45 minutes at gas mark 4. Note, the oven should be preheated! The best way to tell if your cake is cooked is to dip a knife in to the cake, if it comes out clean it’s cooked, if it’s covered in half cooked batter then it’ll need longer!

Icing is fairly straightforward. Mix the icing sugar with the juice of the remaining lemon. If it’s too thick you can add a little water too. Just don’t add too much liquid or you’ll end up with a sugary lemon syrup instead of icing. I top my icing off with the remaining zest from the leftover lemon and the rest of the 50g raspberries! Delicious.

I’ve attached the recipe card below, so feel free to bake this up whichever way you fancy. Let me know which method you think works best!

Happy Baking!

MyIBSandME

Lemon and Raspberry Drizzle Cake Recipe Card.

Almost Low Fodmap Masala and flatbreads

Don’t be alarmed by the fact I’ve started this off with almost low fodmap! Whilst the flatbreads are completely low fodmap, the curry does have a few fodmaps in, however I will highlight where they can be swapped for alternatives.

So let’s start with the Tikka Masala. First of all, use whatever meat takes your fancy, or even vegetables if you want a vegan/veggie version. I use chicken thighs as their moist and hold flavour well, but prawns, beef, lamb all work well too.

So we start off by marinating the meat with some yogurt and curry paste. Now if you want a low fodmap version I would recommend using a lactose or dairy free yogurt, that isn’t soya based. I use the coconut collaborative blue tub of yogurt and it works really well. Now for the curry paste I use Pataks. This DOES contain onion and garlic however I only use a few tbsps and this dish serves four so I’m not eating the high fodmap foods in large quantities. However if onion and garlic really do trigger your IBS symptoms then here are a few alternatives:

1) Buy a curry kit from online fodmap shops such as this one: https://fodmarket.co.uk/products/curry-on-tikka-masala-curry-kit-30g?_pos=4&_sid=7ce9f4770&_ss=r It has great reviews and you can still use it like I use the paste, by simply pouring the same amount of spices into the yogurt.

2) The next option is to make your own. Now I’ve tried this a few times and it’s been successful, it’s just much more work and so if you can cope with the store bought fodmap containing pastes, or are happy to buy the low fodmap alternative on line then I would! However, if you want to give making it a try, the best tikka Masala paste I’ve used is from Karlijn kitchen: https://www.karlijnskitchen.com/en/chicken-tikka-masala/

So now you’ve got your chicken marinating in tikka paste and yogurt it’s time to turn our attention to the sauce. Most Masalas are onion and garlic based. I swap the onion for the green part of spring onions and the garlic for a few chives. This makes it low Fodmap however if you’re highly sensitive maybe try swapping to other vegetables such as peppers to bulk up your sauce.

Once you’ve decided on the veggies in your sauce place them in 300ml of boiling hot water along with the coriander, tomato purée and the rest of your tikka paste and blend it together with a stick blender. If you don’t have a stick blender, an ordinary blender will be fine, just make sure it doesn’t get over blitzed and become very runny.

At this point I would turn my attention to the flatbreads. Now with a curry I flavour my flatbreads with 1 tbsp cumin seeds and a small handful of finely chopped coriander. However you could use coconut, chilli, even garlic if you can tolerate it, to add flavour to the breads. Now these are so simple to make, just combine the dry and wet ingredients separately before mixing together and adding the flavourings.

Once again I use the coconut collaborative blue pot of yogurt and it works really well, plus you don’t need lots of it, so there’s plenty for tomorrow’s breakfast too! The flatbread recipe will make 2 good sized flatbreads so, double up if you need it for four people.

My favourite part of the flatbread making process is flattening them from balls to naan bread looking discs. I do this with my hands but feel free to use a dusted rolling pin. When you cook the breads you need the pan to be super hot, this creates the charred looking brown bubbles on the flatbreads. Creating steam by brushing the raw dough with a little water can also help but be very careful as the water will sizzle on the pan and may spit out at you if you add to much!

Thats all for today, as always let me know how you get on with the recipes! Both recipe cards are below!

Happy Cooking!

@myibsandme

Sweet and sour chicken

My favourite Chinese take away would have to be a sweet and sour chicken, and according to a recent Instagram poll, I found out that you guys love it too!

So what makes a traditional sweet and sour dish? Well recipes that date back to medieval China would use vinegar and sugar, however more modern Chinese versions use garlic, pineapple, chilli, soy sauce and vinegars to create the sweet tangy sauce. It’s actually in western cuisines that we’ve adapted to using ingredients like ketchup and Worcestershire sauce to create our versions of the dish. Now obviously some of the ingredients listed above are a huge no-no for us low fodmappers! So I’ve mixed and matched the basic principles from all three varieties of sweet and sour recipes to create a fodmap friendly version.

I used chicken in my recipe but feel free to swap this for pork, beef or a meat alternative. You can also use prawns but bare in mind they cook much quicker than meat and so shouldn’t be added until the end. On average prawns take about five minutes to cook if you’re using a raw variety, or if using cooked prawns simply add them right at the end!

This dish is also good at sneaking veggies into kids! The sauce uses a tin of pineapple, so there is one definite portion of fruit for the day! Then I use three mixed peppers, again this will count as another portion! If you want to add other foods, baby-corn, water chestnuts and sugar snap peas can work well, but just bare in mind that they aren’t low fodmap.

So if you want to make this delicious recipe, the card is just below. As always let me know how you find it!

Happy cooking!

@myibsandme

Jerk Marinade

With the temperatures hitting over 20 degrees this week, it’s definitely bbq season in the UK. I love a bbq, it’s like the British answer to tapas. You pick your meats and your side dishes, your breads, your sauces. It’s joyous. Truly.

However, when you have IBS, having a BBQ is made so much harder. From gluten in sausages, to onion in burgers and garlic on the shop bought kebabs, you really can struggle. My answer is to make some lovely bbq favourites myself, and completely Low Fodmap too.

Today’s post, focuses on a marinade. You can use chicken, lamb, beef (basically any meet you want, or even cauliflower steaks if you want a veggie alternative), but I’m using pork. Now the next fun task is picking your cut, I use tenderloins because they’re so easy to do on the bbq and they look great when sliced on a board for everyone to help themselves too.

You can serve your marinate meat alongside a simple salad and boiled potatoes for a nice balanced meal, or alternatively pair it with boiled rice and pineapple salsa for a Caribbean hit! You can find a good pineapple salsa recipe on my instagram. If the Caribbean doesn’t tickle your fancy, try a more southern American vibe and have corn on the cob and some dairy free coleslaw! Really the choice is endless, and you can pair it with whatever you like!

PINEAPPLE SALSA

Now for today’s top tip! When marinating meat/vegetables the best and cleanest way to make it is in a bag! If you get a large sandwich bag and place your freshly made marinade inside with your meats, tie it up with some air inside and shake. Hey presto, the meat is evenly covered, your hands are clean, and there’s no washing up! Winner winner!

My other top tip is to use whole ingredients. I know that frying some seeds and then grinding them is a bit of a faff but honestly it tastes 10 times better for the extra few minutes work. If you’re thinking of ditching the frying, don’t! It releases the aromas and the flavours and it also makes the seeds easier to grind! It’ll take all of two minutes, DON’T BE LAZY, DON’T TAKE SHORTCUTS.

FRYING THE SPICES

GRINDING THE SPICES

That’s it for today’s post, let me know how you find the marinade and if it packs enough punch for you! Also let me know what you decide to eat it with!

The recipe as always is below,

Happy BBQ’ing everyone,

@myibsandme x

Quiche Lorraine

So now that uni is over, I’ve finally got the chance to sink my teeth into a bit more baking! As it’s currently that weird time where it’s too cold for a bbq and too hot for a roast or bangers and mash, I thought I’d give making a quiche a go.

Now back in school I remember making these all the time. My teacher would ask us to experiment with flavours and not stick to a boring cheese quiche, however I think there’s something pretty spectacular about the humble quiche Lorraine.

First things first, I had to google why a quiche Lorraine is called a quiche Lorraine. Because honestly that’s baffled me for years. Now I thought it might be named after it’s inventor and have an amazing backstory. ‘Lorraine was born in Yorkshire and she loved pastry’ or something along those lines but quite frankly the real explanation is rather dull.

The quiche Lorraine is named after the ‘Lorraine’ region of France, where they put a pastry case with bacon, eggs and cream’

You see, very boring. I personally might stick to the fact a woman somewhere in the north of England made it by accident when she had too much pastry one day. It sounds far more fun. Did you have any ideas about where the Lorraine name came from before reading this? I want to know if there are anymore crazy ideas!!

Back to my delightful quiche Lorraine for now though. In homage to my great home economics teacher at school, I did use pancetta instead of bacon. I did this purely for convenience though as the packet came pre diced and it meant I have cubes of bacon in the quiche as opposed to thin slices.

For the pastry I used the genius shortcrust pastry which I know I use a lot but it really is the best one on the market in my opinion and I still can’t make my own!! You’ll need to blind bake your pastry so make sure you have baking beans or some rice on hand!

The cheese, is pretty basic for this. A block of Arla lactose free cheddar, because it’s one of the few cheeses I tolerate! If you’re feeling more adventurous though, try a feta, a mozzarella or even a brie. Of course, switch up the other ingredients too, feta and bacon doesn’t sound like a great combo. Sundried tomato and mozzarella however sounds like perfection. If it’s near enough to Christmas bacon and brie might be nice or if you’re feeling Italian, maybe spinach and ricotta. Spice it up, do what you like, just make sure you don’t over do it!

Both the milk and the cream I used were also lactose free. I’ve not played around with milk alternatives too much so I’m not entirely sure how they would bake, but maybe have a play if you’re dairy free and let me know if you have any success!

Now my top tip for quiche making, is layering. I know that sounds odd, but regardless of your toppings layer them instead of just throwing them in. By doing this you’ll have an even dispersion of ingredients and not just a blob of bacon at the bottom! I always start with the bacon, then cheese, then bacon, then cheese and so on!

It’s a relatively simple recipe, so I hope you all manage to have a go! Remember to let me know you’re first thoughts on the quiche Lorraine name! I look forwards to hearing them!! As always the recipe card is just below!

Happy baking,

@myibsandme x

Chicken Pie

I’m sure my fellow Britons would agree that the weather here in the UK has been slightly bipolar over the last few weeks. This always leave me in a dilemma with dinners for the week! How can I plan what to have if one day it could be 24 degrees and the next it could be 12! My answer to the drastic weather change is a lovely wholesome pie, which will fill you up on a cold night but isn’t to overbearing in the heat of spring. You can pair it with whatever sides you want! I went for chips and broccoli as it was sort of normal spring temperatures but you could have it with mash and peas in the winter or with a simple salad in the summer. It’s deliciously flavoursome but isn’t too heavy so really you can eat it all year round.

Now when I made this, I was reintroducing mushrooms. So normally no, they aren’t fodmap and I would advise anyone in the elimination phase to not use them in this recipe (simply add more carrot or use oyster mushrooms which are low Fodmap). If you’re trying to reintroduce like me, (god helps us all) you might want to do a combination of low fodmap mushrooms (oyster, dried porcini or dried shiitake) alongside some which contain higher levels of polyols, or feel free to go the whole way and test them out. There’s 300g of mushroom and 4 servings so you eat about 75g of mushroom in each serving. I use chestnut mushrooms because I prefer the flavour and actually I found that they caused me fewer IBS related problems than a classic button or portabello mushroom. Have a play around and do what suits you.

Moving away from the mushroom debate and onto pastry. I use the genius shortcrust pastry which I leave to thaw during the day ready for baking at night. Now genius isn’t the only pastry on the market, but I find the Jus Rol gluten free pastry to leak oil and no body wants an oily pie [this isn’t an add for genius, just a mere opinion]. If you’re brave of skilled enough to make your own gluten and dairy free pastry then you could also do this (if anyone has good pastry recipes let me know as I haven’t mastered it AT ALL, yet!). I only put the pastry on the top, all be it that I got some backlash from my brother for this. Apparently it’s not a pie if it only has a pastry top. In my defence, it’s still a pie it’s just not the Pukka pie he’s used to! If you’re like my brother and want a pastry bottom and sides, then you’ll need 2 blocks of pastry as opposed to one. You’ll also need to blind bake the bottom and sides for around 15 minutes with baking beans or rice so that you don’t get any soggy bottoms.

So without further ado, here is my beloved chicken and mushroom pie recipe! Feel free to adapt it (I use the same recipe with different meat and veg in all the time…lamb and carrot, steak and kidney to name a few). As always, let me know how your pie turns out! Happy baking!

@myibsandme x

Cherry Bakewells!

Whenever I find myself in the freefrom isle in the supermarket I almost always reach for the little packs of 4 Bakewell tarts. The shop bought ones aren’t strictly low fodmap because of the jam so I thought I’d have a go at making my own.

Now the jam was the hardest problem to solve due to the high amounts of fructants found in jam! However there were a few options. I chose the Sainsbury’s taste the difference black cherry conserve that cost me £1.50! It was the cheapest option and it worked a treat. It’s not completely low fodmap, but according to my app we should be able to tolerate it in small amounts. So it limits you to 21g per serving and all 12 of these bakewells contain 90g so that’s less than 10g a serving meaning your well within the limit!

So next we tackle the pastry! Feel free to make your own or simply pop to the shops and get your hands on the Genius shortcrust block! It’s found in the freezer so make sure you’re in the right section of the supermarket before you begin panicking that it’s not there! I use the Genius block because I know it works and it tastes great but if you prefer a different brand then go for it!

The frangipani sponge was so much easier to make than I thought. I used almond flour that I got in Holland and Barrett but you can also use ground almonds that are available in most supermarkets. Don’t skip the tbsp Of gluten free flour! You do need it surprisingly to achieve a light and well combined sponge.

By far the trickiest part of this recipe is the feathered icing. If you know you tolerate glacé cherries feel free to pop them on top instead. If you’re like me and need an alternative feathered icing works a treat. You basically put your white icing on first, then pipe lines of pink icing about 1cm apart. Use a skewer and gently score the top of the icing, going horizontally across the pink icing which lies vertically. Simple but effective!

Quick note on the blind baking! I use baking beans but rice works just the same. Just make sure you put a layer of grease proof paper or tin foil in between the beans/rice and the pastry otherwise it’ll all mix together!

I hope you guys enjoy making this as much as I did! Let me know how it goes! As always the recipe card is below!

Happy baking

My IBS and Me x

Let’s talk…take aways

It’s IBS awareness month and so I’ve decided to talk about things that I find really infuriating about having IBS and food intolerances!

We all love takeaways and gradually there seems to be progress in this department! Allergen information is creeping onto take out menus and chains are slowly bringing out gluten and dairy free options.

However, there’s still a long way to go as I figured out on Saturday when I tried to order a gluten free pizza without the cheese. Now some of you clever clogs will know that Pizza Hut can easily make this happen with a few clicks of a button online. But unfortunately they don’t deliver to me which is a pain when you want something convenient.

So who else to turn too, Dominoes… Obviously. They deliver to me ✅ they do gluten free pizza ✅ what could possibly go wrong.

A lot. A lot can go wrong.

So because I wanted to order no cheese on my pizza I couldn’t order online, very annoying that they don’t have that option like Pizza Hut do. So I phone up my local store and after about ten minutes of the lady trying and failing to find my address, we got to the important bit.

“Can I have a gluten free pizza please” I asked. Fair enough you’d have thought? However I got a simple reply of “we don’t do gluten free orders on the phone, you have to order online” she said. Leaving me slightly confused. Why did I have to order online for gluten free but not for any other pizzas. Second dilemma, I can’t order online because there’s no option for no cheese! So I explained this to the lady and she simply replied “we can’t do that, we don’t do no cheese options” she explained. Now obviously I knew this isn’t the case. Dominoes make their pizzas to order and so they would very easily be able to skip putting the cheese on! So I asked her why she couldn’t do no cheese, and she simply told me I couldn’t order gluten free on the phone and so if I wanted a gluten free pizza I had to order online. Or if I wanted no cheese I could just order on the phone but the pizza wouldn’t be gluten free! How helpful…they’re willing to cater to one of my intolerances but not both.

Slightly outraged I called up another dominoes in the area who told me, that they would happily take my order over the phone because of my added dairy intolerance! However they couldn’t deliver to me, so they advised me to call the other store back.

So I did exactly that, now even more infuriated that one dominoes would sell me a gluten and dairy free pizza and another told me I could have one or the other. So once we got past the address and my details we arrive at what I want to order. I ask for a gluten free pizza and once again I’m told I can’t order it on the phone. So I do what I probably should’ve done initially and asked to speak to the manager.

He was quick to listen to the dilemma and simply told me that dominoes had been sued so frequently by gluten free customers that they had to change how the pizzas were ordered. Which I can understand, as no one wants to be sued. But equally, I don’t think anyone who already has the hassle of having intolerances should have to order any differently to other people. Now the lovely manager was quick to add that if I ordered the gluten free pizza online then I could just call up after and he would edit the order so that I got no cheese. Now wasn’t that problem overcome quickly. If the woman had told me this in the first place I wouldn’t have wasted 40 minutes trying to order a god damn pizza.

Now let’s discuss the inconvenience of ordering a pizza that’s gluten and dairy free. You have to order the gluten free online and the dairy free by phone. Come on dominoes, sort it out! All of this could very easily be overcome by a simple ‘no cheese’ option when you modify your pizza!

Now after the disastrous ordering process I wasn’t expecting much. Part of me thought they’d spit in my pizza for being so fussy but when it arrived I was practically gobsmacked. The pizza was amazing, I had plenty of toppings and lashings of sauce! It was super yummy and it certainly filled a hole. Was it worth the aggro? Absolutely not. Would I order again? Probably…but only because I really like pizza.

Has anyone else had a similar experiance? Let me know!

MyIbsandMe x

Bolognaise

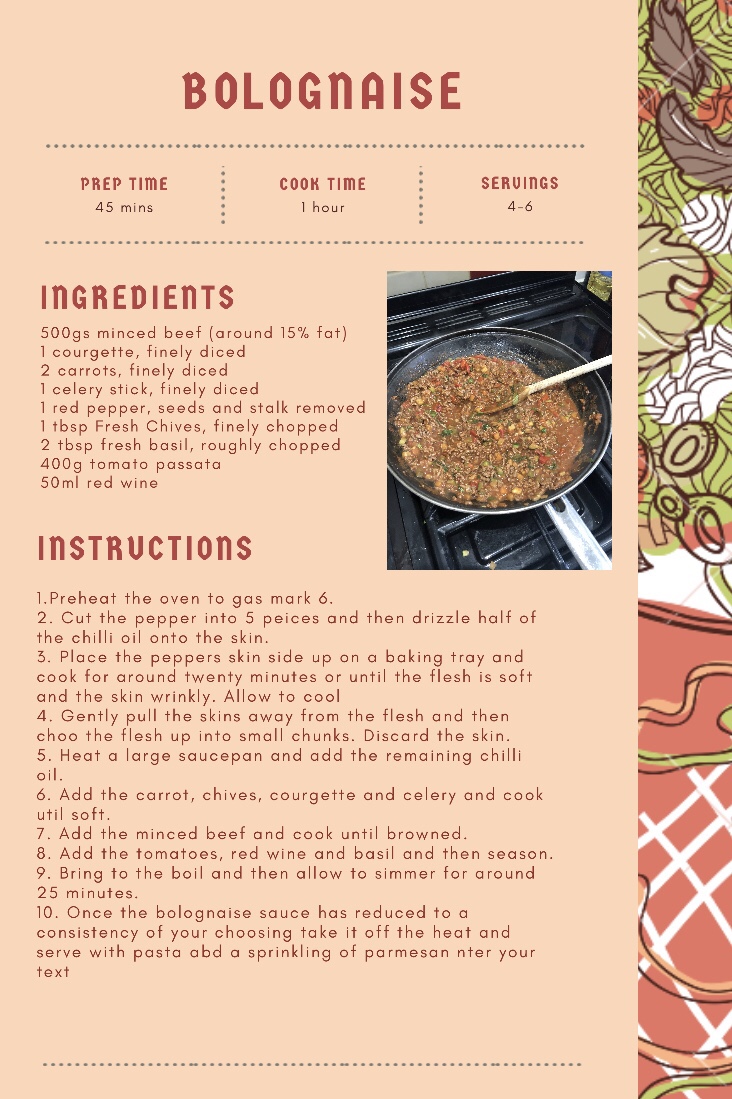
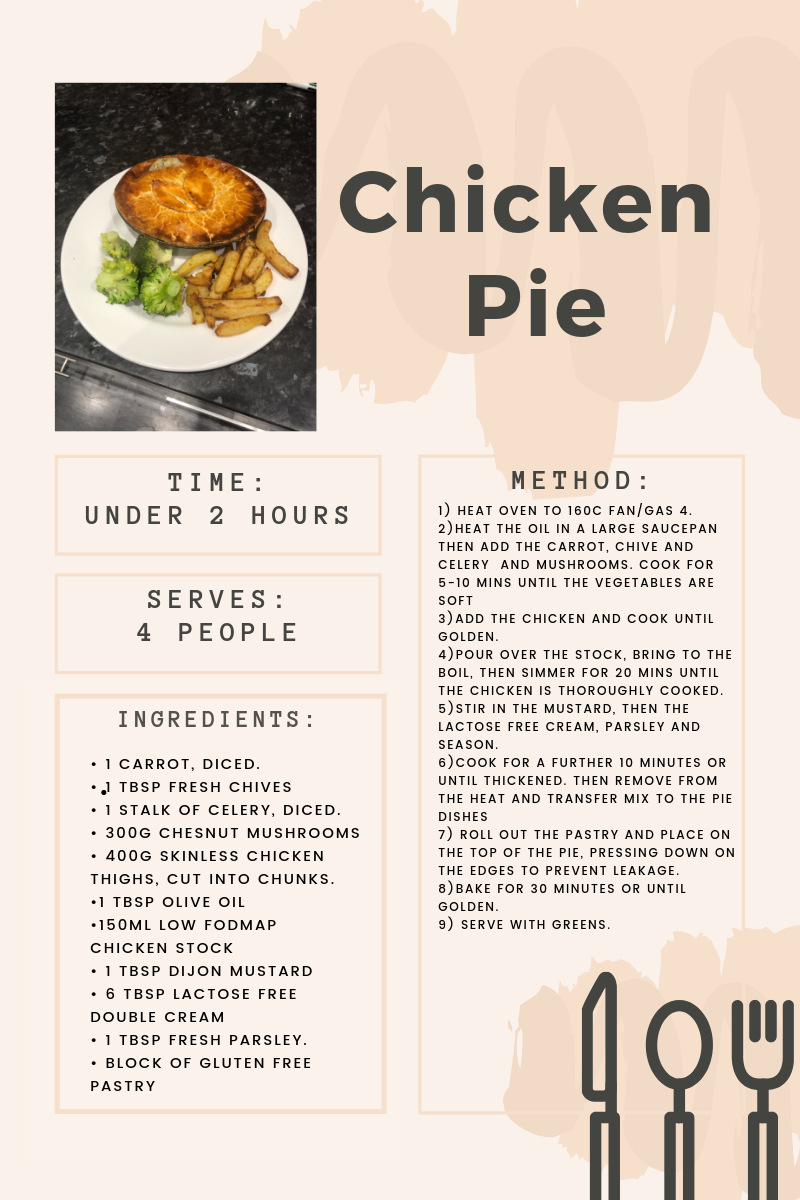
One of the hardest meals to recreate using only low fodmap ingredients is a bolognaise. It’s also one of the most common dishes in my household and many others across the UK as it appears we’re all pretty fond of this Italian classic.

So why is it so difficult to make a tasty bolognaise without fodmaps? Well the answer really lies in the classic recipes from Italy which are called ragu bolognaise. Like most Italian sauces a Ragù bolognaise is made using a soffritto; a blend of finely diced onions, garlic, carrot and celery. Now, I’m sure you’ll easily be able to identify why a sauce using a soffritto would cause us low fodmappers problems! The onion and garlic are big no-no’s and we should only eat celery in moderation. Therefore our low fodmap soffrittos use only carrot and half the normal amount of celery! That means we’re taking out nearly 3/4s of the original ingredients. No wonder getting flavour into a bolognaise is so hard!

So how do we get around this? There’s lots of ways people do it, a pinch of asafoetida, reduced celery, green parts of spring onions etc etc. I opt for a combination of reduced amounts of celery and a good amount of chives. This gives you a similar flavour to the Soffritto that the Italians use and so you know you’re going to be pretty close to the classics.

Now you could stop here, and enjoy your classic bolognaise. OR you could add in a few extra veggies and crank the flavour up to 50. You’ll get more of your five a day sorted and it tastes even better (personal opinion). So what do I add that’s different? Courgette and roasted red peppers.

I actually dice the courgettes up and mix them into the soffritto mix at the start, they add a slight natural sweetness to foods which is always good when your making a tomato based sauce.

Now, if you like a shortcut you can by roasted red peppers in a jar, but sometimes they’re stored in garlic oil so do be careful! If you’re home roasting, then simply pour some oil over the skin and bake in a hot oven for around 20 minutes. Once the skin is wrinkly take them from the oven and allow to cool. Then peel off the skin and You’ll have some lovely fresh roasted peppers, perfect for adding sweetness to the bolognaise.

There’s a number of reasons why I roast the peppers for this bolognaise. Firstly, it allows you to remove the skin which prevents the bolognaise from being bitty and you getting red chunks of peel stuck between your teeth. Secondly, roasting peppers deepens the flavours and so you get more flavour out of the same amount of pepper. Last but not least, roasting makes the peppers softer and almost mushy. This may seem an odd thing to want, but actually this mushy consistency helps to make the sauce a bit fuller and bolder too.

Now for the controversial bit. The beef. Now I know in Italy they tend to use a combination of beef and pork but i tend to just use beef. Even more controversially, the more fat content the better in this recipe. I use around 15% fat, it really enhances the flavour as well as your waist line! As much as you may think a 2% or 5% fat content is better for you, it will result in a dryer bolognaise with less flavour. I’ll let you make the decision though, it is your waist line after all!

I also use red wine in this bolognaise, which is totally optional but again it adds depth of flavour and makes this all the more authentic. It does get reduced down so you don’t need to worry about being drunk after a few bites!!

Now, I’ve left the serving suggestion open. You can use this bolognaise however you want. Spoon it into cannelloni sheets with some ricotta, pour it over some gluten free penne or use it as the Ragù for your lasagne. It’s fairly versatile and that’s why I love it!

As always let me know how it works out for you all, I love a good picture! I’ve popped the recipe card below so you can recreate this as and when you want to!

Happy Cooking Low Fodmap friends!

My Ibs and Me x